Official template · advanced · Key levels
Compare concentration context across gamma regimes.
See whether a nearby GEX wall sits in a stabilizing or amplifying regime before you fade it.
The report UI is recreated from the test app's Sep 25, 2026 session, not a live screen. A historical example with music; no narration.
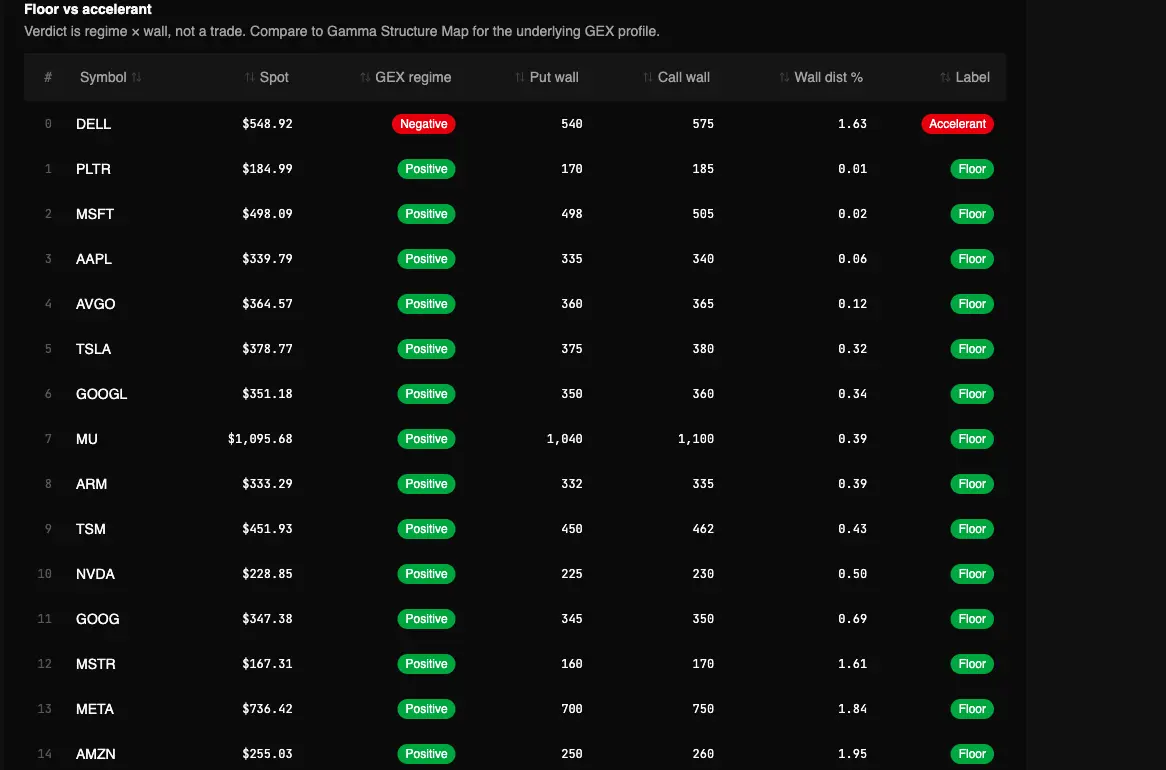
Captured Sep 23, 2026 on testapp.tradingflow.com. This is a historical example; results on this page do not refresh. Swipe across the image to inspect its columns.
- 01GEX regime + wall
- 02Compare convention
- 03Floor / accelerant label
The label is not a break probability or price forecast.
Read the output
- 01Call wall / put wall / net-GEX regime with the same convention-based formula as Gamma Structure Map.
- 02Distance from spot to the nearer wall, as a percent.
- 03A Floor label in positive GEX and an Accelerant label in negative GEX.
Keep in mind
Floor does not mean the wall will hold. Accelerant does not mean a break is underway.
How to read it
From report to evidence01
Run wall-break risk
Open Wall Break Risk — Floor vs. Accelerant in Cookbooks.
02
Read accelerants first, then distance
Negative-regime names near a wall are labeled accelerant. Positive-regime names are labeled floor. Distance is how close spot is, not a timer.
03
Confirm on the map and the tape
Gamma Structure Map still has the strike profile. If you trade the level, inspect session flow. This table will not update tick-by-tick.
Method and limitations
A paid Cookbook that crosses Gamma Structure Map walls with net-GEX regime and distance-to-wall. Floor vs Accelerant is a label on the snapshot, not a prediction that the wall holds or breaks. Official app template: Wall Break Risk — Floor vs. Accelerant.
What the report computes
- Call wall / put wall / net-GEX regime with the same convention-based formula as Gamma Structure Map.
- Distance from spot to the nearer wall, as a percent.
- A Floor label in positive GEX and an Accelerant label in negative GEX.
What it does not claim
- Floor does not mean the wall will hold. Accelerant does not mean a break is underway.
- GEX here is snapshot-era, not live dealer inventory or HIRO/TRACE.
- It does not replace flow at the wall on Option Trades.
Verdict is the Gamma Structure Map GEX kernel crossed with distance-to-wall: Negative + nearby wall = Accelerant, Positive = Floor — labels, not forecasts.
Frequently asked questions
- Will a floor wall hold?
- The recipe does not say. Floor means positive net GEX on the snapshot plus a nearby wall. Flow, expiry, and 0DTE can move both.
- Is this live GEX?
- No. Same T+1 / chain-snapshot convention as Gamma Structure Map. Live spot can sit on a wall that this table still treats as yesterday’s book.
Related recipes
More learning resources
Related glossary
Related personas
The public page explains the report. Run the official template in TradingFlow for a selected completed market session.
Open Wall break risk